SRT Hellcat Forum banner
141 - 160 of 307 Posts
Tip on the industrial ref Chk that it has leak dye only and not dye and sealant they sell both. If you usedquality replacement fittings and system is tite you should see some killer charge air temps. Just a contributing comment
I'm hoping so, after we put the coolant system under vacuum there was no leak and when putting the refrigerant system under vacuum it held at 27inches almost perfect vacuum so we should be good. Looking forward to seeing those temps!


New picture from this afternoon. After a few hard runs I don't really see the intake air temp go back below 1 or 2° above or below ambient. I/C Coolant always stays 25-35 under ambient except after a hard run.

My buddy has a snap on scanner and was able to find "Intake Charge Temp" and it seemed to stay about 10 or so degrees under the Intake Air Temp value.

I'm thinking that it's due to the long tube stainless headers I added and didn't use ceramic coating or header wrap. Considering adding header wrap to see how much that changes things.
 

Attachments

Now your making progress! I should have kept mine but I sold it to get my Barton. It was more important at the time haha.
 
  • Like
Reactions: El-Gato
I have struggled quite a bit with my KC install. The difficulty was mostly due to my inexperience which was compounded by the lack of detailed step-by-step instructions. On a scale of 1 to 10, I’d rate myself as a 3 or 4 at best for projects like this. That didn’t stop me from trying though! Installing my 15” TCE brake kit was way easier than the KC, grinding and all. Here are all the problems I had to deal with along the way in 3 parts.

So here it is, part 1…

After I finally got the front bumper off, I wasted a lot of time trying to figure out how to install the KC unit with the driver side auxiliary HE in place. Apparently removing the aux HE makes room and also makes it a lot easier to plumb in the coolant and A/C lines. As a direct inline replacement, the KC should provide better cooling of IC fluid then the aux HE anyways. Thanks to the members who replied with information regarding their install which helped me move forward from here.

Ok, so how do I mount it? I wrangled with that question for a while. From a few pictures that were shared with me, I saw some very cool custom brackets that were fabricated and I thought maybe I could do the same thing with a hammer and a flat bar of aluminum. Needless to say, my toolset is lacking at home. And what the hell was I thinking? Of course this was a bad idea and I realized that after a couple smacks at the aluminum bar with a BFH against my concrete step. I ended up using some right angled corner braces, nuts and bolts I found at home depot with the stock bolts and bushings from the aux HE mount. I had to cut, grind, and drill these parts for proper fit but that was easy enough. After doing the TCE brake install, I can cut and grind like there's no tomorrow now. On the plus side, I didn't have to make any new holes in the Hellcat and completely re-used the factory holes for the aux HE. I'm quite happy with how it turned out given my limitations.
Image
Image
Image


On to my next issue, I couldn’t find a tool that would work well to press the hose clamps together in a way that would lock them tight. I bought end nippers from Harbor Freight thinking they would work but no, not really. The ideal tool to use is Eaton Weatherhead Crimping Pliers but that’s an expensive investment for one time or infrequent use. I’m pretty sure ear pliers made for Oetiker clamps would have worked but I didn’t have the time or patience to order one in the middle of my install. I ended up using a snap ring plier with a vise grip for clamping force to get through the job.
Image
Image
Image
Image


Somewhere in the middle of all this, I realize my kit was missing the 3-way HE bypass valve kit. I had a long weekend planned to do the KC install and I didn’t want to lose that time so I went ahead with the install without the bypass. The instructions suggested plumbing the KC coolant lines AFTER the HEs so that’s what I tried to do. What I ended up with was a spaghetti mess of IC coolant lines running from the passenger side to the KC on the driver side back to the passenger side. This made it impossible to fill and bleed without putting the system under vacuum. I wasn’t happy with the result and really wish I had just plumbed the KC unit inline between the IC pump and primary HE like most other folks have. On top of that, not bypassing the primary IC HE resulted in only seeing 10-12 degrees below ambient for IC temp at best with the drag kit valve activated (no cabin cooling) in 95+ degree weather. Here is a rough sketch of what NOT to do!
Image


Despite the recommendations of others, I tried staying with 1234yf. I had a local dealer excavate before the weekend and refill after I was done the following Monday. Their machine or procedure did not allow them to incrementally adjust the freon charge level so every adjustment was an hour long ordeal of excavation and refill with a new specified amount that we just made guesses at. They ended up letting me leave with an overcharged system at 270 psi high side in 85 degrees ambient… I believe 7 additional ounces was added from what was originally taken out which was too much. They also failed to educate me that more freon does not mean better cooling… So there was my inexperience again, biting me. And it bites me hard coming up in part 2…
 
Part 2…

After about a week, while driving around in the heat WITHOUT the A/C on at all (I don't remember why I did this), one of my low side pressure hoses from the KC kit pops off the electronic bypass barbed fitting. $$$ 1234yf vented into the atmo… I understand why this likely happened. When an A/C system is left off for a while, the pressure equalizes on both high side and low side to something around 100 psi. I can only imagine how high it got being over charged on top of the Texas heat bearing down on the car while driving around the city. Oh well, I wanted to try industrial 12a anyways so that just accelerated my time table by quite a bit. In hindsight, I should have just gone for refilling with 134a or 12a myself. That would have saved me a lot of money and anguish.

At this point, I received my HE bypass kit and worked to install it while also redo’ing my IC coolant hoses. Everything was easier the 2nd time around. The bypass kit also included better quality insulated hoses then the cheap heater hoses I bought at O’Reilly. I also searched for and found different OEM style ¾” ID hoses that I could use which had various bends and twists I thought might be useful for how I had my KC oriented. Most folks orient their KC upside down with fittings facing out away from the engine bay. These folks may be able to chime in as to why but it made more sense to me to flip it, still upside down but with the fittings facing inward towards the radiator.
Image
Image
Image
Image
Image


All goes well, seemingly, but unfortunately the next morning I wake up to find a small puddle of coolant under the car. This was right before I had a scheduled visit to a local shop that was going to do my rear toe alignment and pressure fill my IC coolant. I got the car up on jacks again and identified the source of the leak. It was the threaded fittings for the 3-way valve. When I installed the fittings onto the 3-way ball valve, I used some Teflon tape that I had laying around the house. I’ll find out later why this wasn’t good enough for this application at sealing but I didn’t have time to deal with it so I let the shop attempt to fix it for me while they had the car.

Well guess what, it still leaked after I got the car back! I then finally learned all about how threaded fittings are primarily sealed from leakage by the proper use and application of proper thread sealant. At this point, I’m feeling pretty dumb. But, I’m still trucking along here so I went ahead and ordered Loctite 37396 565 thread sealant to redo it and finished re-installing the fittings into the ball valve this last weekend. So far so good, no more coolant leaks anywhere from what I can tell and it has been several days now. On top of that, I took the extra time I had to insulate more coolant lines while I had the car up and bumper off, for like the 3rd or 4th time now.
Image


Today I now have everything to charge my A/C system myself. I got 134a manifold gauges, 1234y to 134a charge port adapters, a vacuum pump that’s running at this very moment, many cans of industrial 12a, can tap and a lot of left over pag oil. In part 3, I’ll talk about how charging the system went and what I hope to be my final results. I really wish I could finish tonight but… well it’s getting late and I have neighbors that might not appreciate a late catless Hellcat start up on a weekday.

To be continued…
 
I really appreciate the effort you put in. This is really going to help me with my install. I'm sure many others here feel the same.

Sent from my STV100-3 using Tapatalk
 
I still need to button everything back up and wait for good weather before I can take her out. I ran out of time to continue working on it this morning so I'm just gonna leave you guys with the following. At 79 degrees ambient, HE bypassed, cabin air bypassed and a heat soaked engine that had been running for over an hour in my garage.

Image
 
Hopefully it helps others but I was talking with El-gato and stole your picture ZHC to make a diagram of how I setup my system. Hopefully you don't mind ;)

I do not have a cabin bypass for the drag kit so I can't comment on that.

Edit: Also uploaded a picture of the Snap-on scanner and the PID used to turn the H/E pump on and off even while the car is off. I haven't checked but would assume HP Tuners would have something similar to this. When bleeding the system and testing flow it really came in handy. The unfortunate part is since this is a variable flow pump it runs slowly when not at WOT. I was unable to find a way to increase flow.

Image

Image

Image
 

Attachments

I still need to button everything back up and wait for good weather before I can take her out. I ran out of time to continue working on it this morning so I'm just gonna leave you guys with the following. At 79 degrees ambient, HE bypassed, cabin air bypassed and a heat soaked engine that had been running for over an hour in my garage.

Image
Once the car gets moving, that fluid should be well below freezing. That's pretty cold from just sitting their.
 
Also uploaded a picture of the Snap-on scanner and the PID used to turn the H/E pump on and off even while the car is off. I haven't checked but would assume HP Tuners would have something similar to this. When bleeding the system and testing flow it really came in handy. The unfortunate part is since this is a variable flow pump it runs slowly when not at WOT. I was unable to find a way to increase flow.
I have a Tazer and it seems to activate full flow from the IC pump with it's new cooldown feature. Having this ability is very helpful for bleeding the system but I still recommend filling under vacuum if most of the fluid has been drained during the install. I don't have an air compressor to warrant buying the tool to do this myself so I have to take it to a shop each time I feel I need it. Twice so far... Three times if I decide on adding additional capacity with a reservoir tank.
 
Hopefully it helps others but I was talking with El-gato and stole your picture ZHC to make a diagram of how I setup my system. Hopefully you don't mind
I don't mind at all. I plan to go back and clean up the pictures I marked up. From your diagram and pics, it looks like how your coolant lines are routed is similar to how I initially had mine, minus the 3-way bypass valve. Yours looks cleaner than mine did running behind the radiator alongside the existing factory IC line that feeds to the pump. I had mine looping into the windshield washer fluid area, down, and towards the front under the crash bar. It was an ugly mess with the potential to kink in several spots... It was so ugly, I didn't bother taking any pictures of it!
 
Alright, here's part 3 of my Killer Chiller installation experience.

Now that I had all my lines hooked up, coolant filled, and all the equipment needed to charge my system with 12a myself, I did things... some good and some bad. The bad will probably catch up to me sometime in the future requiring repair or replacement of various components of the A/C system. I'm no expert on A/C systems so I'm going to try to keep the details light rather than spread misinformation. If you're refilling with 134a, then the general steps found from searching around should get you going. If you're filling with industrial 12a however, here are a couple differences that you need to pay attention to.

1) It's recommended that you do not draw 12a into the system in a deep vacuum. I've been told either 5"hg or 10"hg is ideal. The best way to achieve this level of vacuum is by a pressure regulator on your vacuum pump. The cheap ones probably won't have one and that's a problem you want to avoid if you can.

2) 12a operates at lower pressures than 134a and 1234yf. I couldn't find a decent chart so I started with a guess, checked its impact on my vent and IC temps and adjusted from there. I planned to use 1 and a half cans of 12a based on the conversion and yet another guess at how much 1234 my system should have taken with the KC. I ended up using a little less than 2 cans on top of the 2 oz. of pag oil I sucked in.

Fortunately, I only had to deal with one final issue but it's relatively minor. The humidity that morning was over 90%! With cabin cooling enabled, my A/C system was pulling so much water out of the air that it looked like a waterfall underneath my car. I have honestly never seen any car generate this much water before from A/C usage. This wasn't bad, I'm pretty sure it was a good sign actually.

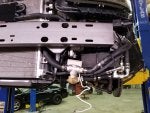
However, this made me realize that any part that gets significantly colder than ambient needed to be wrapped or insulated. That means ALL the fittings on the KC along with the lines before and after the TXV (thermal expansion valve). After confirming that there are no leaks and before putting the bumper back on, insulate everything marked in blue if you live in humid climate. I didn't at first but after I saw the amount of condensation building on these parts, I realized I had to. These parts were super cold to the touch by the way. Very cool, literally.

Image
Image


For the last couple days, I've been adjusting fan settings and idle rpm while in P/N to try and achieve faster and more consistent cool down of IC temps after start up. This is the first behavior that I would be interested in while at a track or race event, how quickly can I get the temps to drop. The other is the change in IC and IAT temps from start to end during a pass.

Right now, I can only test for the 1st behavior and here are my preliminary results. The car remained stationary in park for all tests and I do not currently have additional capacity from the addition of a reservoir tank.

Cold start, hood closed, 88F ambient, HE bypassed, cabin bypassed, it took about 3-4 minutes for IC temps to go from 89F to 42F before the rate of drop slowed down significantly.

Once it gets to 42-44, if I bring the RPMs up to 1.3-1.5k, I get the following results: Ambient 88F, IC 37F, IAT 73F, amazing!

Image


I shut it down and let the car cool for 1 hour. This is my typical track routine in hot weather. After an hour goes by, I start her back up.

Warm start, hood OPEN, 89F ambient, HE bypassed, cabin bypassed, it took about 5-6 minutes for IC temps to go from 105F to 42F before the rate of drop slowed down. Again, if I bring RPMs up to 1.5k, it drops to 37F - 39F pretty quick and stays there. IAT temp was at 90 at elevated RPM. It seems like heat soak was a factor even after letting the car cool down for 1 hour.

This test was repeated one more time and got nearly the same results as above. By the way, there was no visible water dripping anywhere with the drag kit valve in the bypass position. I just had to deal with having warm air blow at me in the car, lol.

I'm really happy with how it turned out plus I got to learn so much in the process. I can’t say I would recommend this to anyone else though. You must really commit to the project and accept that you’re going to be putting stuff into your A/C system that it wasn’t designed for (134a or 12a). The potential for problems is huge if any part of the installation isn’t done right.

With that said, I haven’t heard of anyone else complain about their Killer Chiller on a Hellcat. I’ve read about plenty of bad cases for other platforms from the past, but not really anything for ours. Everyone who has been open about having one on their Hellcat has reported a generally positive experience. Likely, my opinion about the Killer Chiller has more to do with my inexperience as an installer so keep that in mind.

If anyone has any questions, feel free to shoot me a PM. I'm more than happy to answer what I can or point you to someone I know that can provide a good answer.
 
So far, I have only tested how long it takes to chill the IC fluid and its consistency at maintaining chilled temps under normal driving conditions. My KC seems to be working great but I'm not sure If it's better or worst than what others are getting, temp wise. I haven't done any full throttle hits yet since I'm still trying to break in my new rear end.

Here are some videos I took for documentation purposes.

 
Hopefully these guys will get some testing done. I know with the GT500 it was typically 5MPH faster threw the trap from a 60 degree cooler charge temp just for reference.
 
141 - 160 of 307 Posts